Pages

Friday, November 22, 2013

Prepping for Christmas: A Tree Stump & A Little Fur

Happy Friday!  It is cold and rainy here in Indiana today! I have been thinking about Christmas decorating...but I haven't started yet!  Maybe sometime next week.  Just trying to get ideas at the moment.  I want to do some new things in my house this year.  But, before I drag out all my Christmas decor, I wanted to give my house a good, deep-down scrub!  Like one of those, turn the music way up and get on your hands and knees, kind of cleans!!!  However, this isn't just a boring post about me cleaning one afternoon.  Amidst all my cleaning, I freshened up some of my decor as well!


 So, I turned the music up loud and went to town scrubbing every inch of the house!  Once I start something, I am a bit of a perfectionist.  So, vacuuming and dusting wasn't going to cut it this time.  I started moving all of the furniture out of the room or to the other side of the room so I could really get all of those dust bunnies under the couch once and for all!


When I started moving all of the furniture back into place, I thought, I could really use some rearranging in here!  With a couch this large, there isn't a lot of options for moving it.  Just this one actually.  But I needed to change the other areas a bit.  I was getting bored with the way it looked.  Imagine that!   I change my home decor quite a bit for that reason!  But just in small ways to make it look a little different from time to time.  I will move the pillows to different areas or take a couple away, just so when I bring them back into the room after a few months it's like having new pillows!  Or I will move some of my picture frames or vases around.  Add a couple new things from another room and take a few things away!  Nothing crazy. 

 
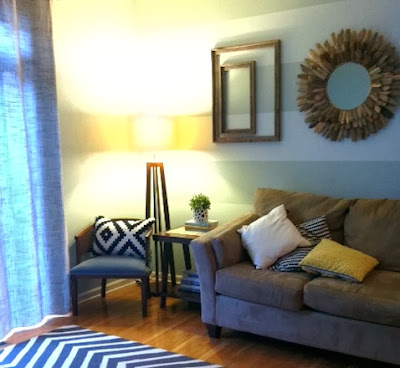
I tried this arrangement.  I moved my couch and side table away from the wall, removed the table lamp I had there, and added a side chair and floor lamp I had originally placed opposite of the couch.  But something was off!  The art work above the couch no longer was centered -- and that was bothering me, and by moving the couch, the dining room now seemed way too scrunched!  So I moved it back to its original place.  I am still deciding where to put my Christmas tree this year (half the reason I started moving furniture around) so we just might see this arrangement come back once I bring the tree in. 


The chair and floor lamp went back to its original home and then I remembered!!  The tree stump I have been working on!  It would be perfect here! 

Have you seen the tree stump side table craze?!?

I've seen natural ones (costing $200!!!!) :
West Elm

I've seen gold ones:

West Elm

I've seen other great DIY versions: 


This is from The Art of Doing Stuff, where I originally got the idea.  I saw her post back in 2011 and I had to make me a tree stump table!  So I did! 

Rewind about 2 years, when I started this tree stump table project.  Coincidentally, my uncle had just cut down a tree in his backyard, so I jumped on the chance to go pick up and pick out the perfect stump for my end table. 


My tools of choice!  With just a hammer and a chisel and the determination to make my own side table, I chiseled away at this tree stump for hours!


The hardest part was getting the first layer of bark off. 


And once I started, it really just started coming off in large sections.  Under the bark I found a lot of dark areas like these.  Mainly from it just being wet and soaking through a little.  So I kept chiseling away and finally sanding it to get the loose wood splinters to stop from continually peeling away.  Until I had a clean, smooth tree stump. 


The plan was always to let is dry out for a couple of months and then polyurethane the whole thing maybe with some stain to create a nice, finished side table. 

Well,  it eventually sat in my garage for over a year to dry out until I was cleaning today, and thought, I am finally going to use my tree stump table!!  So it may not be perfect, and it may not ever be completed, but I am just happy to finally be using it the way I intended!  And I kind of like the natural look of it!!


I also had some chairs sitting around that I still haven't decided what to do with.  You can see more of that here.  So, I decided to bring one into the dining room to add a little something "new" to the space.  It doesn't have seat cushions quite yet, but I had just the thing to fix that!   


I have been obsessed with this faux white sheepskin fur rug from Ikea for quite some time now.  I never knew what I would use it for or where I would put it, so I never bought it.  Well, at only $10, I decided to just buy one when I was at Ikea a couple of weeks ago.  I threw it over my desk chair for a while and I loved it!  I didn't care where I put it, I just had to have this faux fur for some reason. 


I decided to throw it across this little lost chair until I find it a permanent home.  It looks pretty cute for now, so I think I will keep it for a while. 


The next time you do some cleaning, maybe try rearranging things a bit for a fresh, new look to your space.  You never know what you may already have in your house that can be used in a new way to add new life to your space.  I mean, what doesn't say "getting ready for Winter" better than a tree stump in your living room and a little fur in the dining room!


Wednesday, November 20, 2013

Client's Home Office {Lighting}

Originally, for this design project, I thought I was in the clear and wouldn't have to look for any type of lighting for this room.  I picked out the ceiling light for them months ago when they built the home, and we all still like it, so it is staying.
Light from Lowe's
And their existing desk lamp has a really nice shape to it, and is nice and heavy.  Great quality.  Just the wrong finish.  So, I am keeping that and going to give it a quick spray paint makeover.  More on that later.


So, lighting was covered.  No lighting to pick out!  One less thing to put on my to-do list!

Well, that was until I saw this sneak peek picture of the bookcases going in the room!

the bottom section will have doors

The bookcases look amazing!!!  I am so impressed with how well the homeowner built these and I can't wait to see them in the room!  

This is what I sketched up on my computer for the homeowner to build the bookcases.

But, my first thought, as soon as I saw these....I said, "these would look awesome with library lights shining down on each section!"  Well, guess what?  That is exactly what the homeowners thought as well!  So, now we are looking for lights!  And I am so excited because these bookcases are going to look 10 times better with lights!


This flat area is going to be perfect for mounting and wiring 3 library lights, but not just any library light.

They must include all of these things. 
1.  An on/off switch on the mounting plate of the light.  
(something about the way the wiring is being done, they have to have an exposed switch)
2.  Bronze Finish - to match the existing light
(or brass to match the decor)
3.  Adjustable Head - So, the light shines into the bookcase and not just on the floor
4.  Goose Neck - Or at least a long enough neck to showcase the curiosities in the bookcases.
This might be impossible to find!  This is when that moment of "I know exactly what I want, we'll see if I can find it" starts happening.

Do you know my Indiana neighbor girl north of me, Thirfty Decor Chick.  She has an amazing blog to check out if you don't.  Well, her dining room bookcases were our inspiration for my client's bookcases.  And I remembered she added lighting to her bookcases as well.  So I had to go back and find the post and check out her journey of how she found her lighting.  We are both kind of on the same page as far as the style of what we were looking for.  Thanks to Sarah at TDC, a lot of the initial internet sites were checked off my list.  But I still had some looking to do myself to find just the right light in just the right price range for my clients.
Pottery Barn
This is it!  Exactly what I had in mind.  It looks like it can be hardwired as well to hide those cords.  But at almost $200 a piece, I am not sure my client will go for that -- we have 3 to buy!

Ballard Designs
I may have found the perfect alternative to the more expensive one!  At only a little over $100 each, that sounds a lot more reasonable on price especially when you see all it can do.  The arm is adjustable so the light can placed closer or further away from bookcase and the head of the light is adjustable so you can shine the light on any area inside the shelves.  The finish is bronze, so it would match the existing pendant perfectly.  We might have a winner!

And if I look closely, is this an on/off switch on the mounting plate?!?! Oh, I hope so!!


Here are some close runner ups I am also considering.  I like the idea of some of these as well.  I think I need to see them in person.  A trip to Home Depot and Lowe's it is!

Home Depot

Home Depot

Home Depot

Lowe's
 I still like the one from Ballard Designs the best.  It has everything we are looking for.  Off to do a little shopping.  Let's see what we decide on!!

Client's Home Office {Seating Options}

We decided on the Settee Option!  If you remember this home office I have been working on, I gave the homeowners 2 different options for seating arrangements, you can see here.  A seating area with a settee, or 2 accent chairs with a table in between.  We all agreed, the settee option would be best for the room. 


These are all of the settee options I came up with.  (On a side note, I always give my clients options such as this when purchasing a larger item.  It's a huge purchase for them and an item they are going to keep for a while, so I really want them to get what they are going to be happiest with.  At the end of the day, it's their home and they have to live with the design, so options are good, and they feel like they are part of the design process!)

All of these settees had similar qualities.
1.  Good price.  Won't break the bank.
2.  The perfect size for the room.  Anywhere between 58"-72" long. 
3.   Great fabric colors.  I initially thought a light color on the fabric would work best in the room, but my client wanted to see a dark fabric option as well, she has 3 little boys at home! 

The *stars* are my favorites.  With this many options, the homeowner still needs a little direction.  After looking at all the possibilities for the space, we went with #2!!  The settee from World Market was actually one of the lower priced options and one of the better looking ones!  It looks awesome in the room.  The perfect size and color.


A sneak peek of what we have going on so far! (That's how I decide if I am going to like that mirror above the settee!!)  Here are some other items I have been picking up along the way.

Yes, I have been shopping at Target!


And, Home Goods, of course!


And, Pottery Barn. 


And I am finally getting to use grass cloth wallpaper!  Navy!  I love it so much and have been dying for one of my clients to commit to it.  You will have to wait to see where this is going! 


We are getting so close to a completed home office this family can finally enjoy!


Refurbish & Refinish {Grand Opening}

Refurbish & Refinish

As some of you may or may not know, I now have an official space to sell all of my refinished furniture and crafts!  Once upon a time, I was only selling directly through Facebook, and now I have a little booth space within a large antique mall that I like to call my shop!  Because that is exactly what it is!  You will always find one of kind items for your home that are trendy and hand-made with love just for you.  I am constantly filling the shop with new items, new art, new furniture pieces, or crafts to keep up with the season!


So, being the very first Christmas in the shop, I wanted to go all out!  The holiday decor you see for sale includes all of your favorite Pinterest pins, some of my own one-of-a-kind creations, and some beautiful refinished furniture.

I have been giving some sneak peeks the last couple of weeks but now you can see everything I have been creating for the holiday season!  And hopefully this inspires you to create some of your own holiday crafts.


Only 37 more days until Christmas!!!

If you are local (in the Indiana area) or are driving through sometime, 
you can find Refurbish & Refinish at
Upscale Junk & Antiques located at 
23478 US 31 North
Cicero, IN 46074
Open 7 days a week
- or -
LIKE me on Facebook!


Related Posts Plugin for WordPress, Blogger...