Pages

Tuesday, September 23, 2014

Fall Wardrobe Obsessions 2014

 Some of my Fall obsessions include new clothes for my wardrobe!  After all, Fall weather is sweater weather!  Here are some items I am currently crushing on!


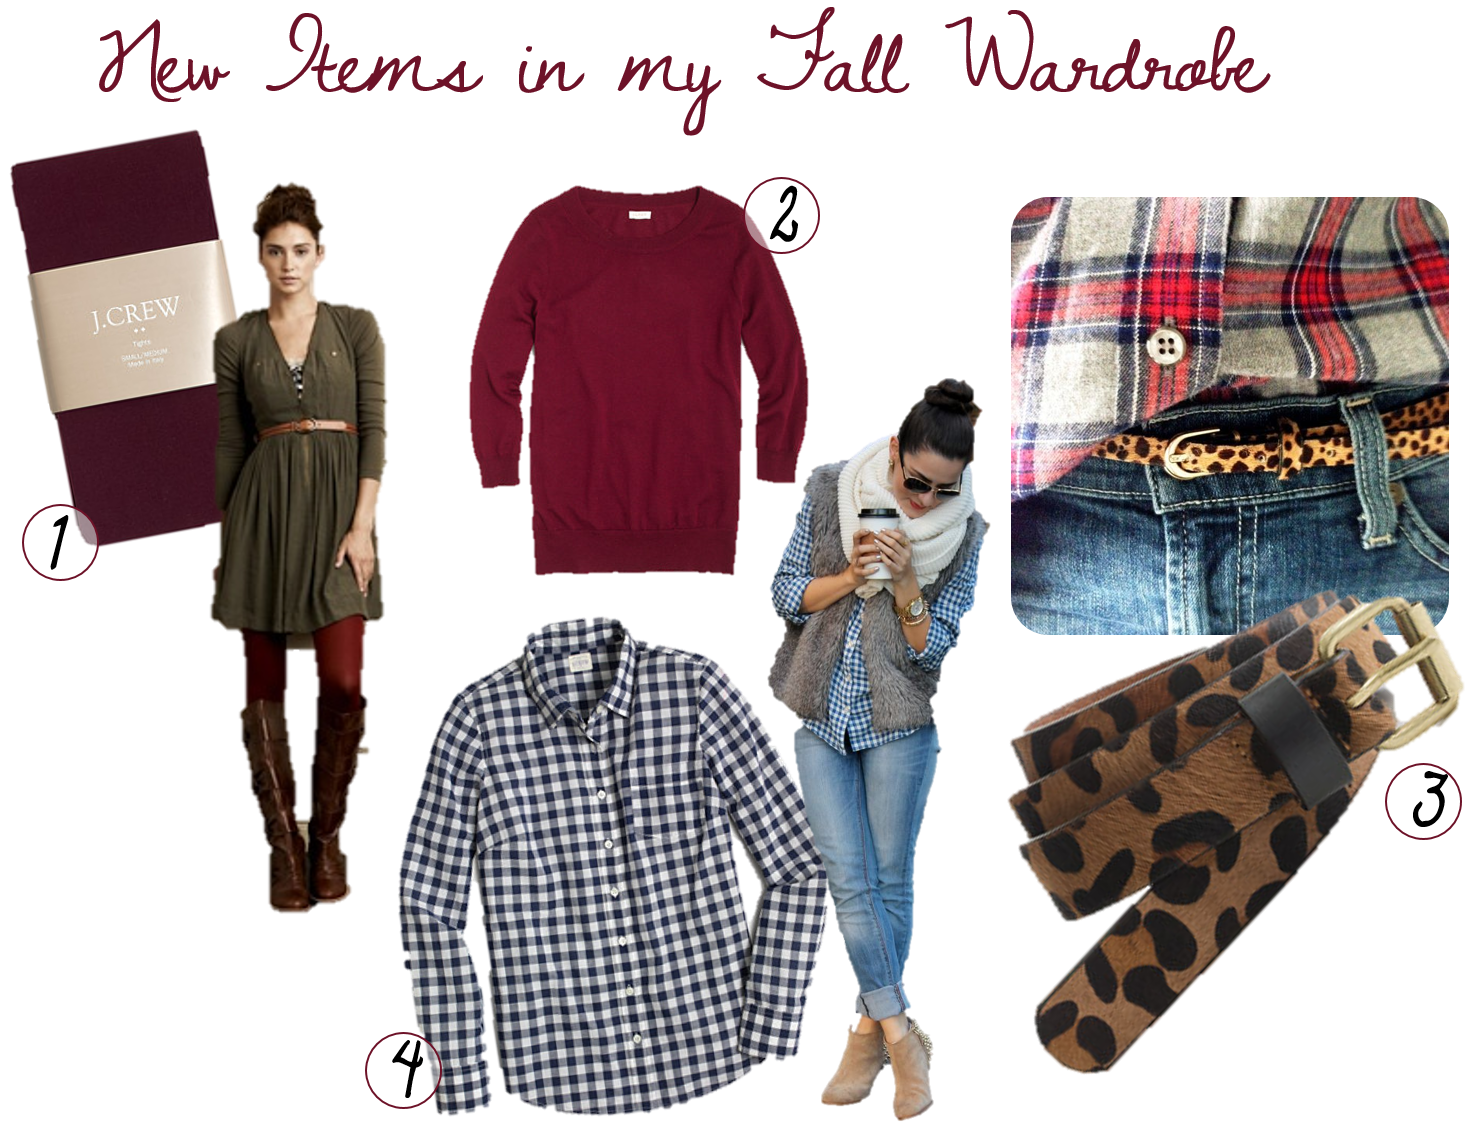
So, I am a little obsessed with J.Crew Factory store!  They were having good Labor Day sales, what can I say.  I knew what I was looking for and they happened to have it.  These wine colored tights will be great dressed up with a black cocktail dress and heels or even dressed down with boots and sweatshirt dress.  I have a very thin cheetah belt similar to this, but I loved this one because it is much thicker.  And I DO wear my cheetah belt a lot!  It dresses up a simple black outfit for work or even a simple plaid shirt like shown.  The sweater is perfect for layering!  It is a light-weight sweater with 3/4 sleeves so it will look great even over this new button-up!  This washed shirt has already been a good transition piece with shorts, with jeans, or under a sweater for colder winter days to come. 

Which brings up another point!  Do you call a collared shirt a "button-up" like I do?  Or do you call it a "button-down?"  Random question, I know, but I've always just called it a "button-up" and some people think I'm crazy for it!   


Leather:  I am noticing a lot of leather accents and details on everything from cocktail dresses, t-shirts, and pants.  I am loving this simple shirt from Ann Taylor with just the right amount of leather on the sleeves and on the front pocket.  Let's not get crazy with the leather, though.  I am not trying to look like a biker babe!

Leopard/Cheetah:  I have always loved a touch of leopard or cheetah in my wardrobe.  Obviously, I just bought my second leopard belt and have some leopard flats already.  But those flats have been worn so many times they are falling apart.  It is time for a new pair.  These are Steve Madden from DSW.  I love that they are a more subtle cheetah print.

Green Canvas:  This warm green shade is great for Fall.  I have some winter leggings in this color that I love!  But I am really wanting a canvas jacket like this one from Old Navy and some green canvas pants.  Any kind of transitional piece that I can wear on casual work days, dress it up, or wear on the weekends are perfect for my wardrobe.  These pants are versatile enough for any occasion.

Burgundy:  If you haven't noticed this burgundy/maroon/dark purple trend this Fall in fashion then you are living under a rock!!  Or just haven't been shopping yet!! Seriously, it is everywhere and I LOVE it!!!  I have the wine colored tights and the sweater for layering but I just think you can never have enough of this color.  Fall -- into Christmas season -- add some sparkle and these pants would be perfect for a casual New Year's Eve night.  They work for Fall and Winter so they are a must-have!  Oh, and I also just bought Revlon's Black Cherry lipstick in this color!  I am not a lipstick person normally, but I might be now! :)

Top Knots:  My hair is finally growing out and getting long enough for a knot!  Maybe not quite a top knot but a low bun is a start!


**images from clothing website or from Pinterest**

Monday, September 22, 2014

An Outdoor Country Glam Wedding


It was the perfect Fall Saturday afternoon for a wedding!  The sun was shining.  Not a cloud in the sky! There couldn't have been a more beautiful wedding day for this outdoor country wedding of Jenny + Kenny!

Jenny has been a best friend to me since Kindergarten!  It was such a special day to help her prepare for the wedding and to stand by her side on the day she married her best friend!


I was honored to help her with her wedding decor for the event.  And of course I loved helping pulling it all together!  I am humbled that jenny asked me for so much advice when it came to her wedding decor.  She had a vision of this beautiful outdoor country glam wedding and we made it happen!

From the cowboy boots to the yellow sunflowers, to all the diamonds, jewels and lace, and country touches of hay bales and burlap, everything was perfect!


I had hours and hours of time in all the chalk board signs I made for Jenny + Kenny but they looked awesome!  I used chalk markers to get a more precise, clean edge to all of the hand lettering.  You can find these at craft stores such as Michael's or Hobby Lobby.  I used varying thicknesses of markers depending on what I was writing.  These will erase, but they are a lot harder to erase from a chalkboard or in our case most of the signs were chalk paint.  I will warn you that once you erase the chalk markers they most likely will have a slight imprint on the chalk paint that won't be able to be erased.  But you can always just add a layer of chalk paint again for a clean slate.  I had a lot of fun doing these for her!


Can't forget to show my handsome date!! 


In loving memory of James Edwin Stout 
{June 13, 1927- September 16, 2014}

{One of the most incredible, talented, compassionate, selfless, loving, funny grandfather's one could ever ask for!  He will be forever remembered and missed by many!}


Tuesday, September 9, 2014

DIY Chalkboard Sign for Fall


I am seeing Fall decor everywhere!!!  Officially it is not Fall yet, but after Labor Day, I think we all have the mindset of saying 'goodbye' to Summer and 'hello' to Fall!  It is a bittersweet time for me....I love Summer and hate to see it end, but I also love Fall....pumpkins...burlap...pumpkin spice latte...pumpkin spice everything...football games...apple cider...mums...leaves changing color...boots...leggings and baggy tops...scarves!!!!

So I decided to embrace Fall (which is almost here) and do my first Fall Decor DIY project of the season to add a touch of Fall to my home!


I ran across a pile of old windows a while back and couldn't pass them up!  I didn't have specific plans for them, but I knew an idea would pop in my head eventually.  I had half a can of chalkboard paint left from another project so I decided to paint the glass of the windows to create a large chalkboard sign!

I love decorating my home with signage during Fall and Winter Seasons.  There are so many holidays within these months that a chalkboard sign is perfect to just erase and add a new quote or drawing for the holiday approaching -- Halloween, Thanksgiving, Christmas, New Year's Eve.

Here are some of my favorite chalkboard art ideas from my Pinterest Board 'holidays.'


This project is so easy!  All I did was clean the window frames and glass up a bit to start.  The hardest part of this was figuring out how I wanted to paint the glass -- roll on the paint or hand brush it on?!?

I decided to tape off the window frame so I didn't get any paint on the wood frame.  I purposely put about 1/4 of the tape edge on the glass so that some of the glass would not get painted with the chalk.  Once the tape is peeled back there will be just enough of the glass showing through to be able to see it once was a window.


The first window I painted, I used a large foam brush.  It took about 5 coats of paint and a lot of waiting on paint to dry in between.  If you have never used chalk paint before, it is a little thicker than normal wall paint and dries pretty quick (or at least it did when I was doing these outside) so you have to be quick.  You also have to do lots of thin coats of paint.  If you try to paint an area with a 2nd coat before it is dry, you run the chance of the first coat peeling off.


The next window glass I painted, I rolled the paint on with a regular roller brush like you would use painting a wall.  Initially, I didn't use this because I knew the roller brush would just soak up a lot of the chalk paint.  But it was SO much easier to roll the paint on the glass than to try to hand brush it on!


I would suggest buying a little roller brush instead of this large one I used.  I had these leftover from another pant project so that is what I used instead of running out and purchasing new ones.  But you can purchase smaller roller brushes that are only about 5-6" long and maybe 1" thick that I think would be perfect for this.  That way you aren't wasting a lot of the paint that is just getting soaked into the foam roller.


I was able to paint two at a time fairly quickly.  And because the paint was going on much smoother with rolling it on, it dried a lot faster.  I still did 3 coats for each window so there wasn't any glass or light peeking through!


Use a paint tray to roll the paint onto your brush.  Or get really smart like I finally did and just pour the paint right on the area you are painting.


After all 3 coats of chalk paint were dry, I used an x acto knife to score the painted area so the tape peeled off without peeling off the paint.  You can see a little of the glass peeking through here too!


This is the old window finished!  I have been wanting a chalkboard in my home for some time now.  I know I will use this through all the seasons, the holidays, birthdays, and celebrations!


When it comes to drawing on the chalkboard, I use regular chalk.  I have found that the chalk markers are a little harder to erase and will faintly be visible on the chalkboard even after you erase.  I find it easier to find a sign on Pinterest for inspiration.  I will look at the image and "try" to re-draw it.  


This is the sign I looked at for inspiration.  From Nest of Posies' free printables. 

I just went for it and started free-handing.  I knew that if I didn't like it, I could erase and start over!


I'll probably add some little pumpkins or something to the table eventually like I did last year, but this is just the right amount of Fall in my home for now!!


The FALL banner is from last year.  You can see how I made that here.    The gourd decoration is from Home Goods a couple of years ago.  I added artificial orange and red flowers to the pink flowers that were already in that vase all summer.  Eventually I will remove the pink flowers once summer is officially over!  The orange frame was made last year with a pumpkin printed onto a dictionary page from my computer.  Simple, yet eye-catching with just a touch of Fall Decor!! 


Friday, September 5, 2014

How-To Decorate with Turquoise


You may think of decorating with turquoise only in the summer months, but it is a great accent color for fall too.  Most people think of only using it in the summer because the bright, cheery color reminds us of the ocean and the beach.  But darker shades of turquoise and teal are perfect accent colors in the fall paired with neutrals like gray, brown, or black.  You will see this color every where right now from West Elm and Target in their new fall home decor.  It is even a hot color trend in accent furniture with refinished antique pieces.


This neutral chair gets a punch of color with a turquoise and cream rug underfoot, a turquoise pillow with a gray and white patterned pillow, and turquoise accents on the rattan side table.


With this client, we started with a very neutral space -- dark hardwood floors, grayish/brown leather sofa, light tan accent chair, and gray walls.  My plan was to bring in lots of color and vibrancy to the room with the accents.  So we picked one color - turquoise - and all of the accents in the room are now in shades of turquoise!


Did you notice that amazing chandelier!!  The homeowners chose this during their home renovation to add some industrial style to the space!  It is really gorgeous!!!

Even though it felt like I was purchasing a lot of turquoise items, once they are all together in the space, the turquoise is not overwhelming at all!


When it comes to choosing objects and accessories for a room or bookcase in just one color, don't be afraid to mix different shades of that color.  For example, we chose turquoise for this space.  But I selected items in all shades of turquoise.  Turquoise can be a tricky color because it can lean towards green or more bright blue.  Instead of picking one or the other, I chose to do a mix of shades.  This gives the space more interest and a more sophisticated, collected look.  I also added in white and silver pieces to break up all the turquoise and add some dimension in the bookshelves.


I've said it time and time again, one of the easiest and least expensive things to add to a bookcase for color are BOOKS!  Who would have thought.  But some people completely forget to add books when styling bookshelves!  Go straight to Goodwill, look under the paper sleeves of the books, and pick your book based on the colors! Now throw the sleeves of the books away and display the beautiful books naked.   I chose books in shades of blue, turquoise, and teal for these shelves.


I shop everywhere when gathering items for bookshelves.  It gives it a more collected look than everything being so matchy-matchy!

Picture Frames -- Home Goods
Bird - West Elm
Clock - World Market Cost Plus
Cloche - Home Goods
Blue Paper Wight - Home Goods
Turquoise Vase - Home Goods
Dark Teal Vase - West Elm
Clear Lantern with Candle - World Market Cost Plus
Books - Goodwill


A good tip when decorating bookshelves like this -- buy more than you will use!  It really helps to have options when styling a space like this.  You may think something will work when you see it in the store, but once you get it home, you may not like it!  So, buy about 5-7 extra pieces to have on hand!


Dark Teal Vase - West Elm
White Vase - West Elm
Picture Frames - Home Goods
Turquoise Vase - Home Goods
Head Statue - Home Goods
Clear Lantern with Candle - World Market Cost Plus
Silver Sphere - Home Goods


 Between the rug, the barstools, the big comfy chair with turquoise accents, and all the turquoise in the bookshelves, I think this space has just the right amount of turquoise to make it bright and colorful with just the right amount of neutrals for the rustic, industrial style!  Do you have any turquoise in your home?  How have you used this color?


Related Posts Plugin for WordPress, Blogger...