Pages

Thursday, December 5, 2013

{Holiday Decorating} Day 2: Decorating a Buffet Table


There are lots of way to go about decorating a dining room buffet table.  Some may opt for displaying their best serving pieces for an upcoming family get-together.  Others may make it an impressive liquor bar area for holiday entertaining.  With no upcoming holiday parties to plan at this household, I decided to do a simple curated display with a mixture of fresh greens, artificial greens, some antique milk glass, mercury glass, and a new way to use upholstery jute webbing.  Also, see how I turn an everyday dining table centerpiece into a festive holiday centerpiece.


The chalkboard art is a blank card from Etsy of Stone and Feather Paper.


The idea of the overall scheme for the buffet table was to keep it simple with whites and greens.  I wanted to use a lot of greenery to give it a fresh, natural look.  Of course, a little mercury glass and a glittered reindeer to add a touch of holiday sparkle!


I found this guy at Hobby Lobby for half off and had to get it!  It is hard to tell in the picture, but he is covered in large flakes of white glitter!!  I kind of wish it didn't say Merry Christmas on it because I want to keep him out all year!


Layering in the pieces!

A table like this - it could be a buffet table, an entry table, or even a dining room table, looks best with lots of layers for interest and texture.  


I started with a hand-made burlap runner to add a rustic base.  I layered on top a plaid, fleece runner.  I made this just by cutting a strip about 12" wide from a larger piece of fleece material used in another project that you will see a little later. 


From there I layered in the larger pieces -- a large glass vase from Pottery Barn and a large piece of art.  This candle holder is awesome because you can change out the filler in the bottom, and the candle sits at the top.  I added pine cones at the bottom and some fresh sprigs of holly and pine around the candle.  The artwork is a special piece handed down to us from a family member's art collection.  


The two matching smaller trees are from Ikea!  My antique milk glass (leftovers from my wedding decor) are the perfect size for holding the trees.


Next up, I added the deer statue.  To add a little height, I added in 3 white books pulled straight out of my bookcase.  (Goodwill books of course, used for decoration, never read!)


On the other side I added a few pieces of mercury glass.  The mercury glass Christmas tree wasn't tall enough to be visible behind the other objects, so I grabbed another mercury glass vase from my bookcases, flipped it over, and set the tree on that to give it added height!


On the left is an artificial plant from Crate and Barrel that I already had.  I just placed it into another mercury glass vase that I had to make it look a little more festive.  On the right, I used another one of my antique milk glass vases and filled it with fresh boxwood sprigs, holly, spruce, and some faux berry picks.


Layer by layer -- table runners, tall pieces, short pieces, fresh greens and some sparkle, a beautiful dining room buffet table Christmas display is easily created!


Now, more on that cute little banner I made to hang across my picture!


Upholstery Jute Webbing has been around for hundreds of years.  It is most commonly used as an upholstery base on the seat or back of the chair to hold up all of the other materials.  The wide natural colored trim has red stitching woven in which makes it a perfect accent to holiday decorating.  And at only 99 cents a yard, it is much cheaper than most ribbon this size.  Since I bought my webbing at Hobby Lobby, I have seen this online for as low as 77 cents a yard.

 
Its popularity for craft projects other than upholstery has risen in the last year thanks to places like Pottery Barn and Etsy in pillows or curtains.  This is my first time working with the material, so I decided to start small with a cute little, super easy, banner!!


I cut 5 strips, each about 3-1/2" in length.


Hot glued jute string to the top, leaving about half an inch between each.


Once they were all glued together on the string, I cut the bottoms at an angle.


I just attached the jute string to the back of my picture with masking tape.  And it's really just that easy!!


You'll notice different ways I used the upholstery jute webbing throughout my home tour!


I like to use everyday objects and decorations in a new way for my Christmas decorating.  You'll notice I do this a lot!  This is a glass cloche that I keep on my table year round.  The artificial plant in the middle is from Ikea.  Instead of switching out the entire arrangement, I just swapped the plant with Christmas ornaments and slipped a plain wreath around the glass jar.  The glass cloche is from Crate and Barrel clearance.  I got it a while back for only $15 but I don't think they carry them anymore.  You could do something similar with any clear vase or even a tall lantern.  


The wreath is also from Ikea!  Only $10 for a plain and simple wreath.  


(See how I transformed the antique buffet table into a showstopping piece with just a can of marigold paint!)


10 more days of Jessica's Holiday Decorating to go and 

only 19 more days until Christmas!!

Tuesday, December 3, 2013

{Holiday Decorating} Day 1: How to Decorate a Christmas Tree


Seeing the glow from the lights on my Christmas Tree for the first time is one of my favorite parts of Christmas!  Nothing says Christmas more than a beautifully lit tree!  

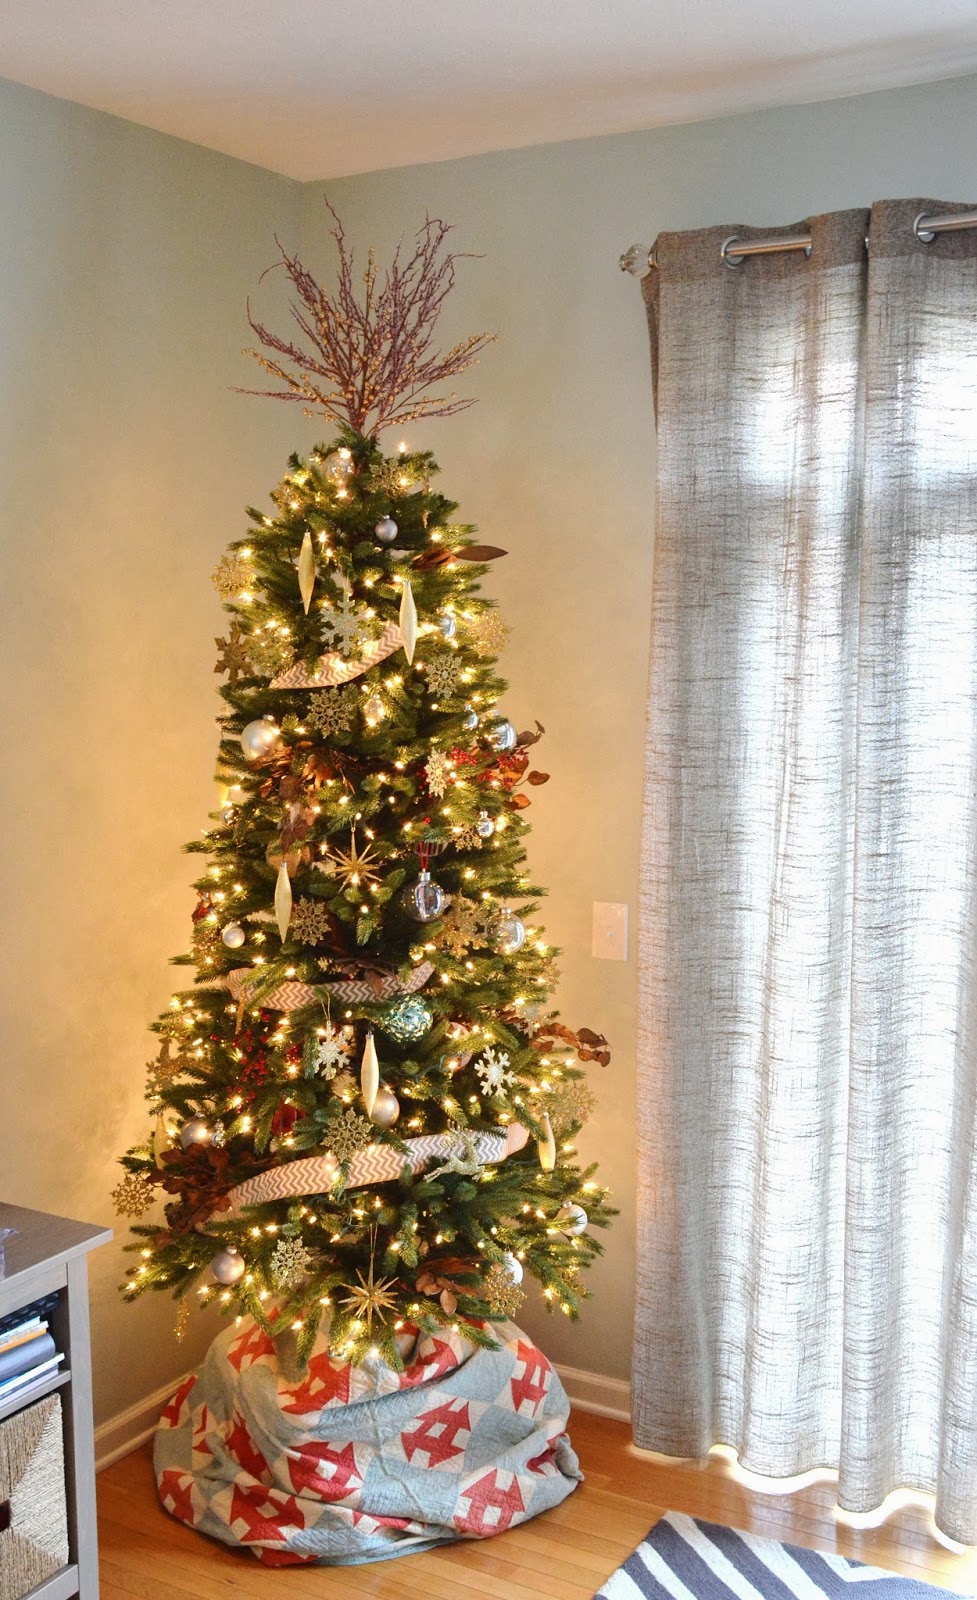
Tree decorating is pretty straight forward, real or artificial, it's about the same.  I have always had an artificial tree.  I grew up with artificial, so I guess that is what I am used to.  The idea of picking out my own real tree sounds appealing maybe in the future when I have kids to start new family traditions.    I actually used to work at a Christmas tree farm so, I have nothing against real trees.  But for now, I will stick with my pre-lit artificial tree!  Just add some lights, some ribbon, maybe a tree topper, a tree skirt, and some ornaments, I like a mix of handmade, old and new ornaments, and you have a well trimmed tree for the holidays!  

Here are a few extra TIPS to get you started!


Give your tree a boost and some extra height with this clever tip!  I like to use one of the storage containers I keep all of my tree ornaments in to add some height to my Christmas Tree.  It gives it a larger, grander appearance without the extra tree to decorate.  My tree is only 5-1/2 feet tall, but with an extra 18 inches or so from the plastic container, I easily add height to fit the scale of the room.  The last thing you want is your Christmas tree to look puny!!  Added bonus -- you will have more space for all of the packages under the tree!  Don't worry, I have a clever way of hiding that ugly box too!


I've never used a typical tree skirt and probably never will.  Because I raise my tree up on a box, I use something larger to hide all of the ugliness!  To me, Christmas is about family and traditions.  And what better way to incorporate family tradition into my Christmas decorating than by using an antique quilt hand-made by my Great Grandmother!  The colors are vibrant after all of these years and match my Christmas decor perfectly.  It is just the right amount of love to make my tree special!  In place of the standard tree skirt you could use anything from a Christmas blanket to a piece of fleece from the fabric store, or even a piece of burlap.  


Another non-standard thing I do when decorating my Christmas Tree is I don't go for the classic star tree topper!   I love the star as a tree topper but can never seem to find one I like.  And I seem to change my Christmas tree color scheme A LOT, so this is much easier!  I use a grouping of decorated sticks and berries found at local craft stores, or Hobby Lobby for me, and bunch them together at the top to create a topper!  I used 5 of the glassy looking red twigs and about 3 of the gold beaded twigs.  You won't need many more than that or it will look out of control like a bad hair day!  Less is more!  They are easier to manage if you place 3 or 4 in the tree at a time.  I use a couple of zip ties to secure the twigs to my Christmas Tree.  It's a more modern twist on a traditional classic. 


That leads me to Tip #4.  Okay, I was only going to do 3 tips for the day, but I feel like I have to touch base on this last one.  It is the biggest, most common mistake made by people decorating a Christmas tree.  Pick a color scheme for your tree and stick with it!  


 It doesn't have to be the same as the rest of your holiday decor, even though that does look better if it is all cohesive.  Because my living room is painted in a soft blue and I have blue and yellow accents throughout, last year I decided I wanted to do a blue color scheme for my tree.  It was very pretty with soft blues and silvery tones, but this year, I decided to go more natural, and elegant.  So I have included golds, silvers, a little red, and some mercury glass to pull it all together!


A tree with one, maybe two, three, at the most colors, will have the biggest impact and give it a designed appearance.  For the biggest impact, use all red, but different shades of red.  For a softer, more elegant feel, whites and golds are classic.  For a more playful tree, maybe for the kids' room, pick a more playful color palette with pinks or blues.  

Lots of different textures will add depth and interest to the tree.  I have metallic ornaments.  I have shiny and honed gold ornaments.  I have glass, sparkly, and handmade paper ornaments.  The ribbon I used is burlap.  And to really add volume in the tree and to make it look full, I use more of those decorative twigs or berries and stick them throughout the sides of the tree.  Anything to make the tree look like a planned out, cohesive look will work.  You could even do a snowflake theme and use only snowflake ornaments.  The goal is to not mismatch too many colors.  That is when the tree will start to look messy and cluttered and in turn takes away from the beauty and essence of the Christmas tree!  


This is the time I like to sit back with a hot cup of coffee and a cozy blanket on the couch with my husband and just stare at all the twinkling lights on my Christmas Tree!!

Day 2 is all about decorating a dining room buffet table!  

Only 20 more days until Christmas! 


Jessica's 12 Days of Christmas Decorating


It's my favorite time of year!!  Follow along with me the next 12 days of Christmas for holiday inspiration, decorating tips, and an inside look at an interior designer's home for the holidays!  


So, here's the deal.  For the next 12 days, I will be giving you all of the inside scoop of how I decorate my home for the holidays, how I put together someone else's home for the holidays, and lots of other fun holiday tips and decorating surprises in between!  


Each day will be a new post featuring a different area in my home.  In each space, I have included some fun and easy tips you can use in your own home this year, and some great DIY projects as well. 

This year, not only do I have my house to decorate, but I also have a client's house that I will be doing all of the decorating for as well.  It will be another great inside look into getting a house ready for the holidays.  Unlike me, she has a fireplace to decorate!  So, that is very exciting for me.  She is also very tired of her old holiday decorations.  So I will show you the Top 10 things you can buy NEW this year to incorporate in with your existing decor.  

I have my annual Pinterest Craft party coming up!!  Which means, lots of new craft ideas to share!  (hopefully no Pinterest fails!!)  And of course, I won't forget to feature my wonderful sister's home at the holidays because I have already been helping her with her house as much as mine.  And her house just looks beautiful at Christmas!  

I have lots of fun treats planned to share with you all and I am so excited!  This is going to be a great December!!  I hope you enjoy what I have done, share what fun projects you are getting into yourself, and most of all, especially at this time of year, I appreciate you all following along with me throughout the year!  

Here's a quick recap of what my house looked like LAST year during Christmas!  I have a lot of new ideas for this year though!


3 things I noticed from last year to this year:

1.  My decor has grown-up a bit!  I have definitely stepped it up a notch this year!
2.  My really bad camera phone I had! Ugh!
3.  Our TV has grown in size!


Here is an idea of what I have in mind for this year...


See lots more holiday decorating I find inspiring on my Pinterest page and my HOLIDAY Board.

Only 20 more days until Christmas!! 


Related Posts Plugin for WordPress, Blogger...