
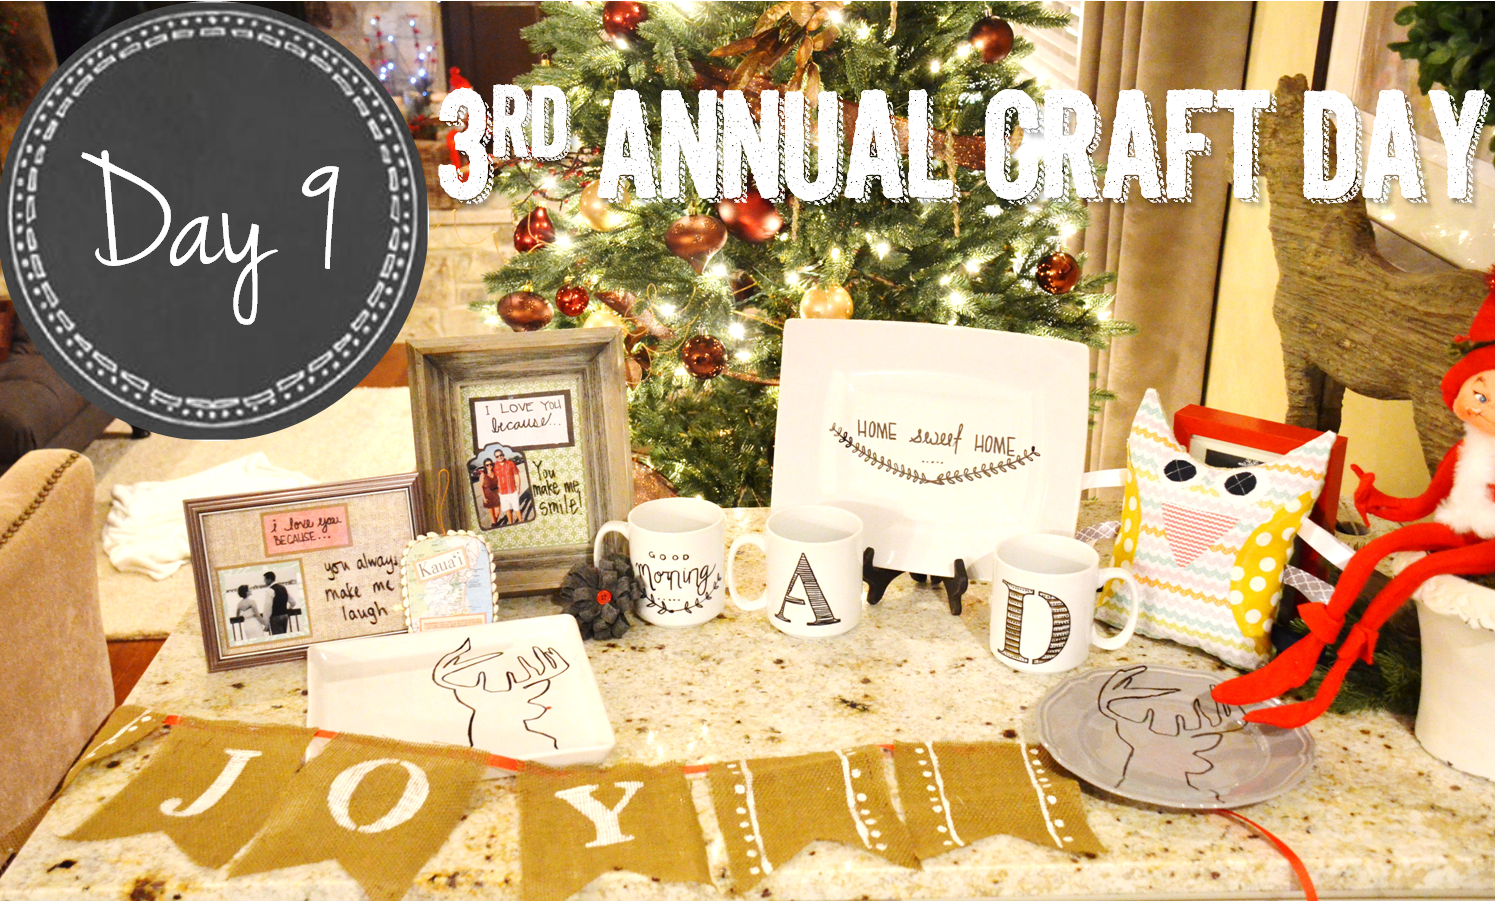
Despite the snowfall this weekend, 3rd Annual Craft Day
hosted by myself and my sister, was a great success!!
The snow fell Friday evening and continued into Saturday! Was Craft Day going to be cancelled?!? NOOOOO! Family and friends trickled in from the snow one by one, and Craft Day had officially began!


 |
| Craft Day Hosts: Julie + Jessica |
My sister and I started Craft Day 3 years ago when we started loving all of the fun and creative projects we were seeing on Pinterest! With so many great ideas pinned and never finding the time to actually create the projects that we loved to "save for later" we dedicated an entire day to gather with friends and family to make all of our favorite Pinterest crafts and DIY projects together! It is a great chance to bring together all of our craft-y friends and all of those not so craft-y friends, for a chance to help each other create great things together.
 |
| The girls with all of our crafts! |
 |
| A Family of Crafters: cousins, Aunt, Mom, sister, sister-in-law, and niece |
We have always scheduled our Craft Day just before Christmas so we can make ornaments, gift tags, holiday decor, or Christmas gifts for family and friends. We all bring all of our craft supplies together to share tools and supplies. Overall, it is just a great day to get together with some of my closest friends and family for a fun day of eating, drinking, and being merry creating!

In the past, we have had everyone bring supplies of their favorite craft and they teach everyone else how to make it. In return, we would all go home with 5-7 crafts! That is typically how it goes. It was a little chaotic this way! Overall, it was too much crafting for one day.
So, this year, we did things a little different!
My sister and I came up with 4 crafts for everyone to do. They would bring their own supplies for the crafts they would like to create of their choice. They could choose to do 1 or all 4 of the crafts. It made for a much more relaxed, enjoyable, organized day.
A List of Our Crafts:
1. Sharpie Art on Dishware
2. DIY Christmas Ornament
3. "I Love You Because..." Dry Erase Frame
4. Burlap Christmas Banner
(And a DIY Owl Plush Baby Tag Toy for the kiddos!)

Sharpie Art on Dishware
I first saw these on Pinterest and thought "that looks so easy!" What a perfect craft it turned out to be for the day. Everyone brought their dishware of choice. I provided the markers. And we all left with some great gifts for ourselves and for others!

What You Need:
Oil-Based Sharpie
You CAN NOT use a regular sharpie. If you use a regular Sharpie instead of the oil-based, the sharpie will wash off. Some Sharpies will say Paint Marker but will also say oil-based in the fine print. The oil-based marker will make the dishes dishwasher safe. We used black, gold, and white on a black plate.
Oven Safe Dishware
We had everything from appetizer plates, coffee mugs, platters, and serving trays to create our Sharpie art. Just be sure the dishware is OVEN SAFE! Anything porcelain or ceramic works perfectly!


We used the same Reindeer silhouette cutout template from the internet to trace that I used on the Christmas pillow I made for my guest bedroom. See Here!


I used letter stencils to create monogrammed coffee mugs for gifts!


Put the dishes straight into the oven on the rack.
Bake at 350 for 30 minutes!
Be sure to let the dishes cool! They are very hot when they come out of the oven.


Some of my work I brought home with me -- for me and for gifts!


DIY Christmas Ornament
Traditionally we always make a handmade ornament each year during our Craft Day. There have been amazing life milestones amongst our group of crafters, such as weddings, babies, and 1st year anniversaries. So we always make an ornament to commemorate and collect through the years.

What You Need:
A blank pre-made cardboard ornament
You can find these at most craft stores in the holiday section or the cardboard and wood section. They come in different shapes and sizes.
Picture
Print off the picture of your choice of the milestone from the year that you would like to remember.
Glue Stick, Glue Gun, or Mod Podge
Details
Scrapbook paper, glitter, ribbon, scrapbook letters, buttons, etc. This can be anything you want to decorate the ornament with. Some used glitter, others used real shells to remember a honeymoon in Hawaii.
Scissors


"I Love You Because..." Dry Erase Frame
This project also originated from a sighting on Pinterest. It is quick and easy and great as a Christmas gift for anyone. I decided to make one for my husband so we can leave notes for each other to show appreciation of the small things we do for each other. My friend created one for her 6 month daughter as a gift to her Daddy...I Love You Because...You read books to me! It is an easy project for any special person in your life.

What You Need:
Picture Frame
Any size, of your choice.
Scrapbook Paper
This will be the background of the paper and also for added details.
Sharpie Marker
Picture
You can frame a picture as well if you want to add more detail or you can keep it simple with just the words.
Dry Erase Marker
You will write your notes on the front of the picture frame glass with a dry erase marker.
Scissors


The scrapbook paper with the image layered on top all gets placed inside the frame. Be sure to write the words "I Love You Because..." inside the frame as well, on the scrapbook paper. The note that you are going to write in response gets written on the front of the glass with a DRY-ERASE marker. That way, when you wipe it clean, only the note gets wiped off to make for a new note the next day!

Burlap Christmas Banner
I have made lots of these in the past, but today I got to teach someone else how to make the festive banners. That's the fun of Craft Day - sharing your projects with others!

What You Need:
Burlap
Scissors
Ribbon
Long enough for the length of the banner and about 6-12" extra on each end to tie the banner in your chosen destination. Any color. Any thickness.
Paint
Apply the paint with a small, quick dabbing technique like you would with stenciling. Most of the paint goes through the burlap, so not a lot of paint is needed and be sure to do this step on a paper plate or piece of cardboard.
Letter Stencils
I found the perfect size stencil letters at Hobby Lobby. They come in a pack of the entire alphabet and numbers.
Small Foam Paintbrush
Just a very small amount of paint is needed to blot on the burlap inside the stencil to create your letter.
Hot Glue
The ribbon will be hot glued to the back side of the burlap pennant pieces.


I created a cardboard template for the burlap banner shape. We wanted a swallowtail shaped pennant for the banner instead of the traditional triangle.


DIY Owl Plush Baby Tag Toy
The last project we made for the babies! The idea came from a craft show where we saw these handmade Owl Plush Toys selling for $18. We are a family of "Oh, we can make that!" when we go to craft shows. So we snapped a quick picture of the toy without anyone noticing and decided to try it out on Craft Day.


My niece is obsessed with tags! We will give her a toy or a stuffed animal, but all she tends to play with are the tags on them. So, this one was created with her in mind!
What You Need:
Minky Dot Fabric
This is the super soft baby fabric. Comes in a variety of colors. We used this for the back of the toy.
Variety of Fabrics
You will need at least 6 different coordinating fabric pieces to make the front of the owl. This is when all of those pieces of fabric scraps come in handy.
Ribbon
The silky ribbon is the best! That is typically what the babies are drawn too and like to feel. But you can do a variety of colors and textures.
Sewing Machine
Fabric Scissors
Iron
Pattern
We created a pattern for each piece prior to making the Owl for efficiency. This way you can get each piece the correct size and make sure it all goes together before sewing it.


Putting all the pieces together!

The front and back side of this baby boy's Owl Toy.

My Aunt made her grandson one before Craft Day to be sure it was as easy to make as we first thought when we saw them at the craft show. A little time consuming to cut all the pieces out, iron it all out, sew them all together, but still fairly simple!

The front of the Owl and the back get sewn together inside out, just like you would when making a pillow. Once it is all sewn together with the ribbon, leaving a hole at the bottom about the width of your palm, turn the Owl right side out, stuff with batting, and hand sew the hole closed.


 |
| Emersyn + Grandma |
When I showed my niece the new toy I made for her, her eyes lit up and got really big! She LOVED it!

I found a lot of things similar to the Owl Plush Baby Tag Toy online at Etsy too, if you don't want to make one yourself!
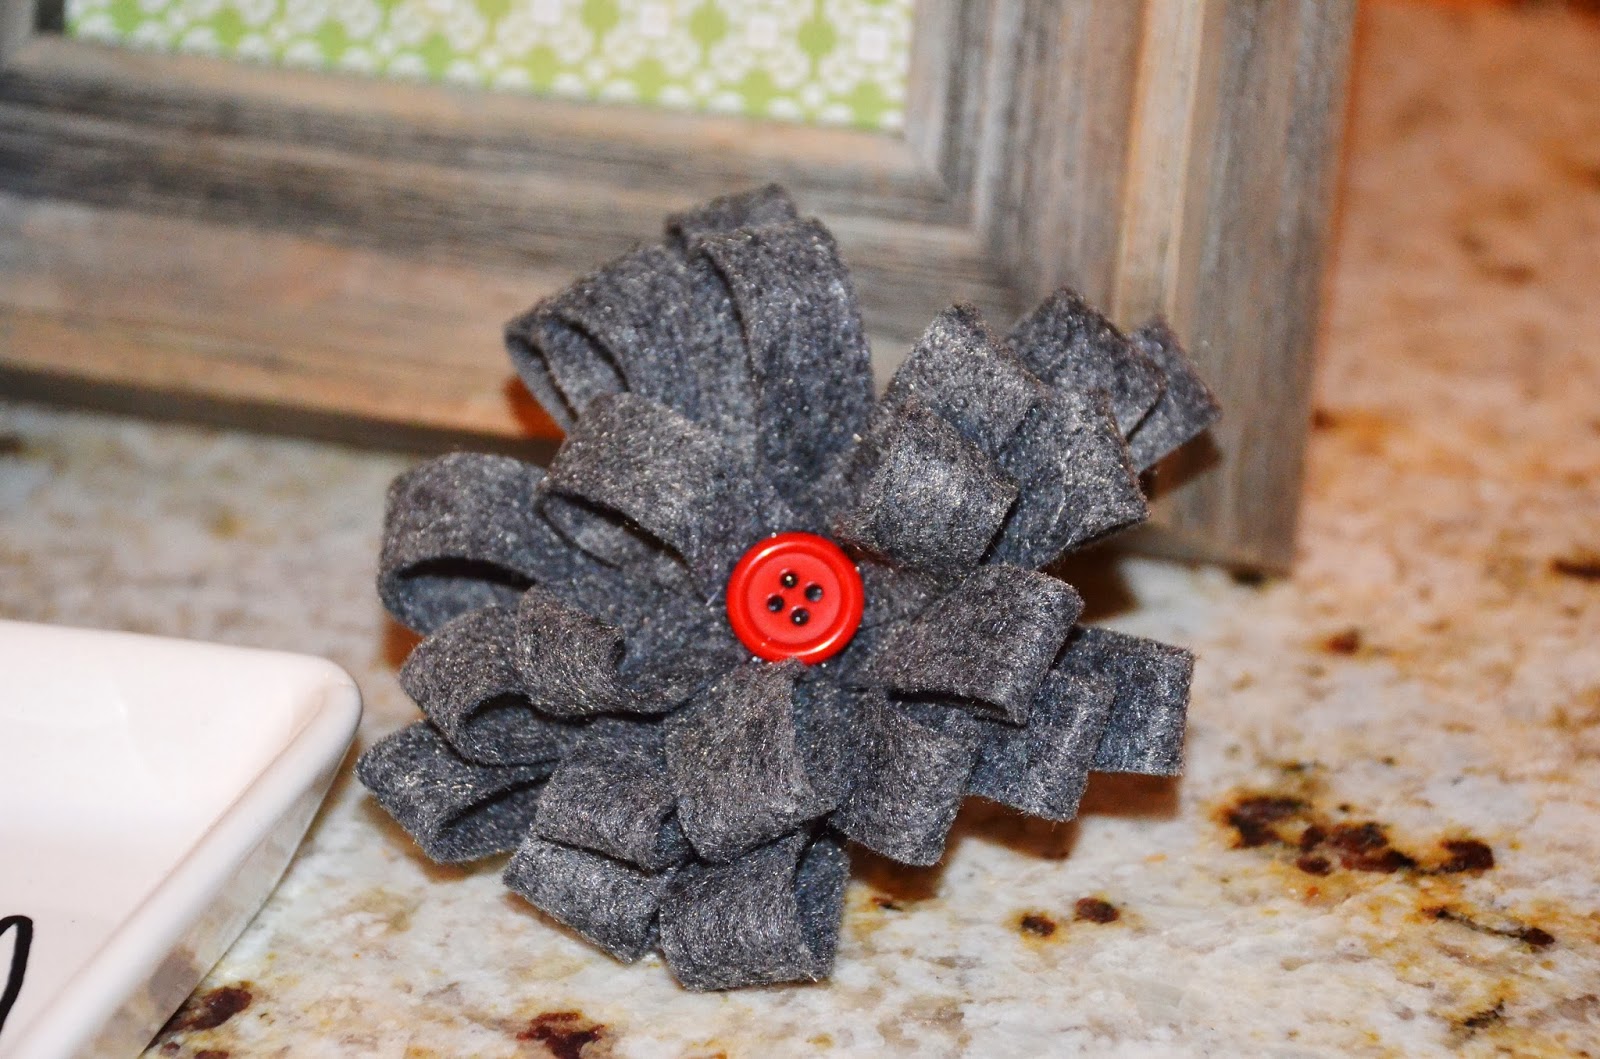
Felt Flower Pin
My Aunt also had a super easy new craft she wanted to share. Again, she
saw these at a craft show, bought one to see how it was made, and
decided to make her own from there. We just couldn't stop crafting!!

What You Need:
Felt
Any color you want for your flower. The large piece has to be at least 12" long.
Hot Glue
Safety Pin
This must be the craft kind that has the back that can be hot glued to the felt.
Buttons
(optional) for the center of the flower


With all of this crafting we worked up quite an appetite! Good thing there was plenty of homemade chili, cheese balls, hot ham sandwiches, dips, cookies, cupcakes, and Sangria to go around!


Every time I make these Hot Ham Sandwiches for parties, baby showers, wedding showers, people go crazy for them! They really are the BEST sandwiches ever! So, since I am in the holiday spirit, I have decided to share my recipe.
 |
| King's Hawaiian |
Best Sandwich Ever: King's Hawaiian Rolls Ham & Cheese Sliders
Ingredients:
20 small King's Hawaiian Sweet Rolls (1bag)
*I have used other types of dinner rolls, but these are the best!*
1 lb. of Ham
*Honey Ham is a little too sweet. I use just Baked Ham*
10 slices of Baby Swiss Cheese
1/3 cup Mayonnaise
2 Tbsp. Poppy seeds
1 1/2 Tbsp. Dijon Mustard
1/2 cup Melted Butter
1 Tbsp. Dried Minced Onions
1 Tbsp. Worcestershire Sauce
A large baking pan that will fit all 20 rolls
*I use one of those disposable aluminum pans, it fits all 20 rolls perfectly*
*I have made these with other combinations of meat and cheese, and still delicious!*
Prep Time: 15 minutes
Baking Time: 15 minutes
Cut the Hawaiian Rolls in half.
Place the bottoms of the rolls in the baking pan.
Place a piece of ham on each roll
Place 1/2 a slice of Swiss cheese on each roll
Spread the mayonnaise on the inside of the top of the roll and place one on each slider in the pan.
In a mixing bowl, whisk together the melted butter, Dijon mustard, dried minced onion, and Worcestershire sauce. Pour this mixture over the tops of the sandwiches. (I know it sounds crazy, but trust me its delicious!) Sprinkle all of the sliders with poppy seeds.
I then refrigerate this over night to let the mixture soak up in the rolls overnight.
Bake at 350 for 15 minutes or until the cheese is melted. Best served warm!
These sliders go quick at parties! Everyone will love them!
Pip & Ebby have a great step-by-step picture tutorial of this, but her recipe is slightly different!


I also made a wonderful wintertime Holiday Sangria!
It just looks so festive for the holidays with the red and green!

Ingredients:
2 Granny Smith Apples
1 cup of fresh cranberries
1 sprig of fresh Rosemary, extra to garnish
1 bottle of Pinot Grigio, or your favorite white wine
1/2 cup of White Grape Juice
1 can of Club Soda
Just chop, combine all of the ingredients, pour, and enjoy!

I garnished each cup with a fresh sprig of Rosemary and a spoonful of fresh cranberries to make the drink look more festive! And be sure to use a clear cup to see all of the pretty ingredients!

It tasted as good as it looks!
This is literally the best collection of crafts! I wish I would have found your blog before Christmas!! I need to pin all this for next year! But I still might have to copy the mug idea of "shh there is wine in here" HAHAHHA
ReplyDelete